
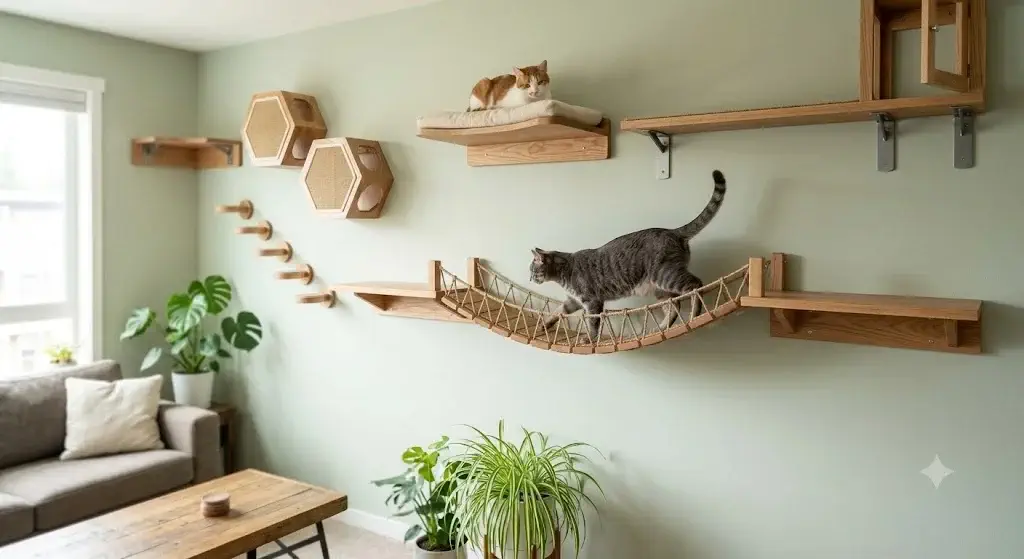
How to Create a Cat Wall Highway: Continuous Overhead Layouts
A cat wall highway connects vertical climbing shelves, horizontal bridges, and resting perches into an uninterrupted elevated transit circuit across residential living spaces. Unlike isolated perches that create dangerous dead-end bottlenecks, a properly engineered cat wall highway provides continuous multi-directional travel routes above human head height. By incorporating multiple ascent ramps and exit descents, vertical highways defuse feline territorial aggression, expand usable square footage in small apartments, and provide biomechanically safe landing zones.
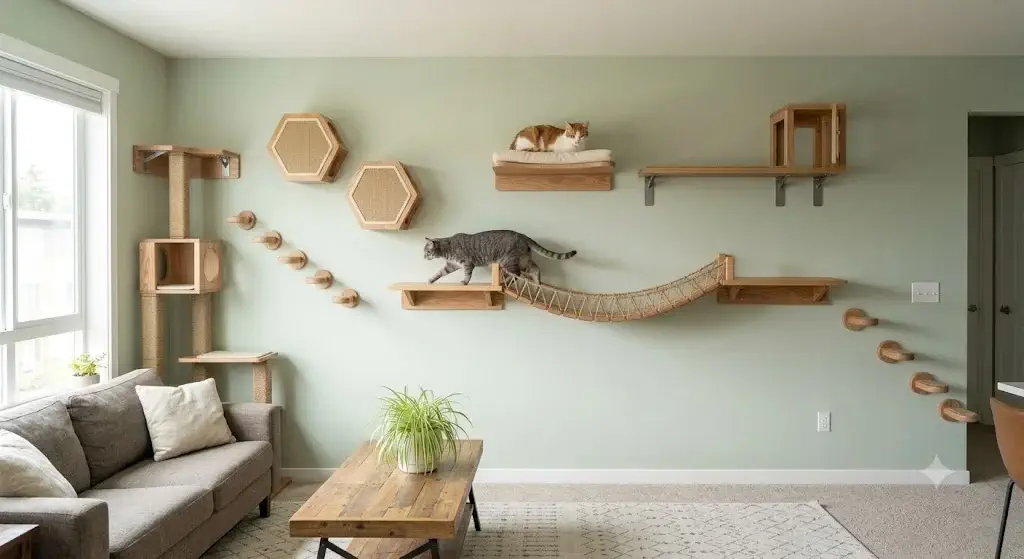
Quick Reference Specification: Cat Wall Highway Architectural Metrics
| Highway Zone Component | Elevation Standard (From Floor) | Horizontal Run Spacing | Dynamic Load Requirement | Architectural Purpose |
|---|---|---|---|---|
| Ascent On-Ramp (Steps/Ladders) | 18″ to 48″ Vertical Grade | 8″ to 12″ Step Centers | 35 lbs per individual step | Propels cats from ground level into overhead space |
| Main Transit Span (Bridges/Catwalks) | 60″ to 84″ (Above Door Frames) | 32″ to 64″ Span Length | 45 lbs across dual end anchors | Transits active rooms without ground-level human contact |
| Resting Terminal (Loungers/Caves) | 72″ to 90″ (Sub-Ceiling Zone) | 16″ to 24″ Platform Depth | 50+ lbs on two 16″ O.C. studs | Provides surveying territory and secure sleeping nodes |
| Descent Off-Ramp (Emergency Exit) | 48″ down to 24″ Transition | Max 12″ Vertical Drops | 40 lbs downward landing shear | Eliminates dead ends to prevent subordinate cat cornering |
Quick Answer: How to Build a Complete Cat Wall Highway
Creating an effective cat wall highway requires connecting at least three functional zones—an ascending on-ramp, an overhead horizontal transit corridor, and an independent descent off-ramp. Begin by locating 2×4 framing studs on 16-inch centers, plot a continuous path that maintains vertical step gaps between 8 and 12 inches, and install high-traction suspension bridges or catwalks above door frames to span human traffic routes. Never terminate a cat highway with a single dead-end perch; always provide dual exit trajectories so subordinate felines can escape aggressive housemates without jumping to the floor from hazardous heights.
- Step 1 (Map Studs): Scan drywall using an electronic stud finder to identify structural 2×4 framing anchors spaced 16 or 32 inches apart.
- Step 2 (Establish Elevation Zones): Divide your vertical wall into Low Transit (18″–48″), High Highway (60″–84″), and Lookout Penthouse (72″+).
- Step 3 (Connect Horizontal Spans): Link separated shelf clusters with flexible wooden suspension bridges or rigid catwalks to eliminate floor descents.
- Step 4 (Engineer Dual Exits): Install independent climbing stairs at both ends of the room circuit to eradicate aerial territorial traps.
Before drilling, verify your component holding ratings in our comprehensive cat wall furniture weight capacity guide.
Continuous Highways Eliminate Dangerous Dead-End Aerial Territorial Traps
Dead-end wall perches cause multi-cat territorial conflicts whenever a dominant cat corners a subordinate cat on a terminal shelf. In wild and domestic feline behavior, vertical elevation equates to social confidence and territorial security. When a cat highway terminates at a single perch with only one way down, the dominant feline can easily claim the choke point, forcing the trapped cat to either fight or leap dangerously from heights exceeding 6 feet:
The Choke Point Problem
Single-entry perches allow assertive felines to block access routes, causing submissive cats to avoid the vertical system entirely out of stress.
Continuous Loop Geometry
Circuits connecting from Wall A across a bridge to Wall B and down to a sofa arm create circular traffic loops where cats can pass each other seamlessly.
Passing Lanes & Bypass Pods
Installing wide 18-inch shelves or tiered bypass ledges along the main highway allows two felines to cross paths without physical friction.
Tri-Level Vertical Zoning Organizes Highway Speed, Resting, and Access
Architectural zoning divides the wall height into three functional strata that serve distinct physiological and behavioral purposes. Planning your cat wall highway requires allocating specific furniture components to these elevation tiers:
| Highway Stratum | Target Elevation Range | Primary Furniture Types | Behavioral Function |
|---|---|---|---|
| Zone 1: Launch & Landing (Lower) | 18″ to 42″ above floor | Climbing pegs, sisal ramps, low steps | Easy on-ramps for kittens and arthritic seniors |
| Zone 2: Transit Highway (Mid-Level) | 48″ to 72″ above floor | Suspension bridges, long catwalk planks | High-speed linear travel above dogs and kids |
| Zone 3: Penthouse Vantage (Upper) | 72″ to 90″ (Sub-ceiling) | Enclosed boxes, hammock perches, wide loungers | Deep sleep security and total room visual command |
To choose foundational resting perches for Zone 3, compare our curated rankings of the best cat wall shelves.
Constructing a Cat Wall Highway Follows Five Engineering Phases
Systematic layout planning ensures your wall highway provides structural stability while protecting home interior drywall. Follow these five installation steps to assemble a secure aerial circuit:
Phase 1: Stud Mapping and Room Sightline Evaluation
Use an electronic stud finder to locate the center lines of wall studs across the entire installation wall. In North American residential construction, framing studs are placed 16 inches or 24 inches on center. Mark each stud location with light painter’s tape from floor to ceiling. Ensure the planned highway path clears open door swings, window curtains, and overhead light fixtures.
Phase 2: Calculating Step Spacing and Incline Ergonomics
Map out intermediate climbing steps using blue painter’s tape cut to component dimensions. For agile adult cats, maintain an 8-to-12-inch vertical rise with a 10-to-14-inch horizontal spread. For Maine Coons, Ragdolls, or senior cats, reduce the vertical rise to 6 to 8 inches to minimize joint impact shock during fast descents.
Explore individual climbing peg specs in our review of the best cat wall steps.
Phase 3: Fastening Structural Ascent and Descent Anchors
Drill 1/8-inch pilot holes directly into the center of wooden studs to a depth of 2.0 inches. Fasten the ascending on-ramps and descending steps using #10 or #12 structural wood screws measuring at least 2.5 to 3.0 inches in length. Never rely solely on plastic drywall expansion plugs for active launching steps, as feline bounding force easily tears plastic plugs from drywall sheets.
For complete tool checklists and fastener torque tips, refer to our manual on how to install cat wall shelves.
Phase 4: Spanning Horizontal Drywall Gaps with Bridges
Connect separated shelf clusters across doorframes or wide wall sections using flexible wooden slat bridges or rigid catwalk planks. Ensure bridge end mounting brackets anchor solidly into studs on either side. Keep the center sag on flexible suspension bridges taut (under 2 inches) to prevent balance disorientation in hesitant felines.
Select tested suspension hardware from our guide on the best cat wall bridges.
Phase 5: Traction Lining and Static Proof-Load Testing
Line all bare wooden catwalk planks with self-adhesive non-slip carpet treads or dense felt liners to prevent slipping during high-speed chases. Before allowing pets onto the system, apply a 35-to-50-lb downward manual proof-load test to each shelf and bridge anchor point. If any bracket deflects or pulls loose from drywall, reinforce the connection immediately.
Modular Layout Blueprints Adapt to Different Room Sizes and Floorplans
Tailoring highway architecture to specific room layouts optimizes spatial enrichment without cluttering human living areas. Review these three proven room configurations:
Blueprint A: The Corner Wrap-Around Circuit (Small Apartments)
Components: 4 Climbing Steps + 1 Corner Perch + 1 40-inch Bridge + 1 Exit Shelf.
Uses two perpendicular corner walls to create a 90-degree circuit. Cats climb up Wall A, round the corner via a specialized corner platform, cross over the bridge on Wall B, and descend near a couch arm. Maximizes underutilized corner wall space.
Blueprint B: The Over-Doorway Express Corridor (Living Rooms)
Components: 1 Floor Cat Tree (On-Ramp) + 1 59-inch Bridge over Door + 2 Perches + 1 Wall Step Descent.
Bridges across high-traffic room thresholds. Felines launch from a freestanding cat tree, traverse the horizontal span directly above the hallway doorframe, and step onto viewing perches on the opposing wall, entirely isolated from human foot traffic.
Blueprint C: The 360-Degree Continuous Room Perimeter (Multi-Cat Homes)
Components: Multiple interconnected shelves, suspension walkways, and 3 distinct exit points.
The gold standard in feline territory engineering. Circumvents the entire perimeter of a room using floating shelves, window loungers, and bookcases. Provides multiple bypass pods and three exits, ensuring zero cat can ever be cornered.
Positive Scent Marking Accelerates Highway Adoption for Hesitant Cats
Introducing felines gradually to elevated highways builds spatial confidence and prevents fall injuries. Never lift and place a fearful cat onto a high, unfamiliar wall bridge against their will. Instead, follow behavioral habituation techniques:
- Scent Transfer: Rub clean hand towels on your cat’s facial scent glands (cheeks and chin) and wipe the scent across each wooden platform and bridge rung before installation.
- Low-Level Food Baiting: Place high-value treats or freeze-dried meat bits on Zone 1 access steps to encourage voluntary upward exploration.
- Feather Wand Guidance: Use a long interactive wand toy to guide your cat’s visual focus up the ascending steps, allowing them to test surface friction under paw pads naturally.
- Initial Bridge Stabilization: If your cat shows hesitation over swaying suspension bridges, place a temporary solid cardboard stiffener beneath the slats for the first two weeks until balance develops.
Frequently Asked Questions About Creating a Cat Wall Highway
How high should a cat wall highway be installed?
The main transit catwalks should be installed between 5 and 7 feet from the floor (60 to 84 inches). This clears standing human head height and door frames while leaving 18 to 24 inches of clearance below an 8-foot ceiling for comfortable feline perching.
Can you build a cat wall highway in a rental apartment?
Yes, provided you anchor cleanly into studs with narrow wood screws rather than tearing massive holes with plastic anchors. When moving out, simply fill the 1/8-inch screw holes with spackle and touch up with paint to recover your full security deposit.
How many exits does a cat wall highway need?
A cat wall highway should always have at least two independent exits (an on-ramp and an off-ramp). In multi-cat households with three or more cats, plan three exits to completely eliminate the risk of territorial cornering.
What happens if studs aren’t where I want my shelves?
If framing studs do not align with your desired shelf layout, you can either install an attractive solid wood backing ledger board spanning across two studs, or use 1/4-inch steel channel toggle bolts rated for heavy drywall shear loads.
