
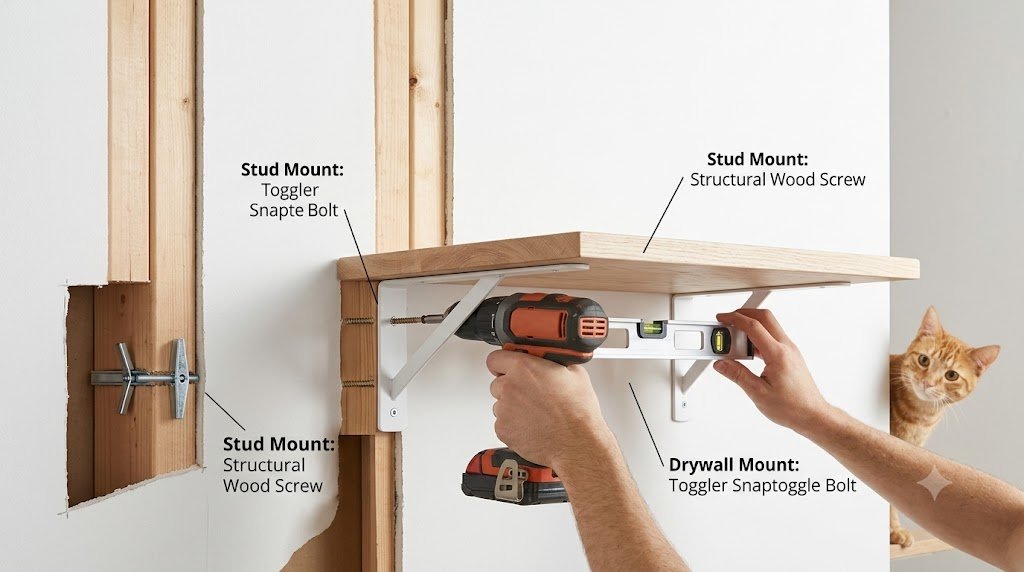
How to Install Cat Wall Shelves into Drywall and Studs (2026)
Learning how to install cat wall shelves into drywall and studs requires calculating dynamic landing force multipliers and selecting appropriate fastener hardware to prevent catastrophic wall tear-out. When an active adult feline leaps between elevated perches, gravitational acceleration multiplies its static body mass into 2.5 to 3.0 times dynamic downward shear and outward cantilever torque. Safely executing how to install cat wall shelves into drywall and studs means anchoring primary load-bearing brackets into 2×4 timber framing studs using structural cabinet screws, or deploying 3/16-inch steel channel toggle bolts when studs are misaligned with your architectural runway layout.
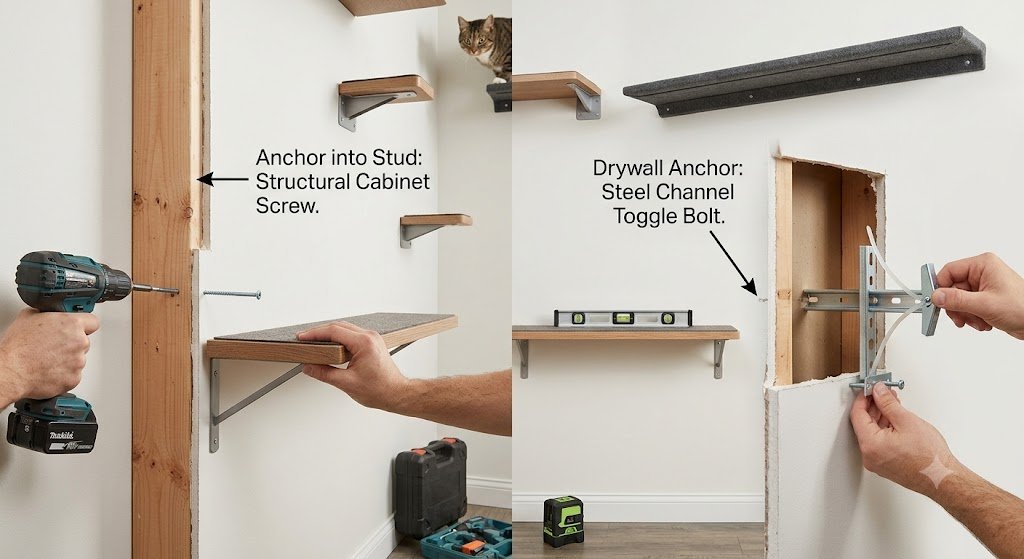
| Substrate / Mounting Anchor | Fastener Specification | Pre-Drill Pilot Bit | Rated Dynamic Shear | Tensile Pullout Limit | Structural Safety Margin |
|---|---|---|---|---|---|
| Solid Wood Framing Stud (2×4) | #8 or #10 Structural Screws (2.5″–3.0″) | 1/8″ (3.2 mm) Wood Bit | 120–150 lbs per screw | 180+ lbs | Maximum (Essential for heavy breeds) |
| Hollow Drywall (1/2″ Gypsum) | Steel Channel Toggle Bolt (3/16″–1/4″) | 1/2″ (12.7 mm) Spade Bit | 50–70 lbs per anchor | 60–80 lbs | High (Safe for light waypoints) |
| Self-Drilling Zinc Anchor | #8 Threaded Zinc Wall Anchor | Self-Starting Tip | 25–35 lbs static only | 15–20 lbs | Marginal (Unsafe for dynamic leaps) |
| Plastic Expansion Sleeve | Standard Yellow/Red Plastic Plug | 3/16″ Twist Bit | 10–15 lbs static only | <10 lbs | Zero (Extreme tear-out failure risk) |
| Solid Masonry / Brick Wall | Concrete Screw (Tapcon 3/16″–1/4″) | 5/32″ Masonry Hammer Bit | 200+ lbs per screw | 250+ lbs | Exceptional (Industrial grade) |
Quick Answer: How to Install Cat Wall Shelves into Drywall and Studs?
Installing cat wall shelves into drywall and studs requires locating 16-inch center studs using an electronic edge sensor and securing load-bearing brackets with 2.5-inch structural wood screws. For open wall sections where framing studs do not align with your intended climbing layout, you must use 3/16-inch metal toggle bolts (such as the Toggler Snaptoggle) rather than standard plastic drywall plugs, as hollow drywall alone cannot withstand dynamic bounding torque. Always maintain vertical step rises of 12 to 18 inches and horizontal gaps of 12 to 16 inches to protect feline lumbar joints during high-speed transit.
According to feline orthopedics data published by the American Association of Feline Practitioners (AAFP), unstable vertical platforms that exhibit micro-movement create spatial anxiety, deterring indoor felines from utilizing essential vertical territory and increasing household stress behaviors.
Dynamic Cantilever Physics: Why Plastic Drywall Anchors Tear Out
Cat shelves act as class-one cantilever levers that convert dynamic feline landings into severe rotational moment torque against wall fasteners. When an adult 12-lb cat leaps downward onto a shelf extending 10 inches from the wall, the impact creates far greater force than resting weight. The kinetic energy generated during a descending pounce multiplies effective load by 2.5 to 3.0 times:
This dynamic force exerts rotational torque across the shelf’s vertical mounting bracket (H_bracket), creating intense outward tensile pullout force on the top fastener and inward compression at the bracket’s lower edge:
For a 10-inch deep shelf with a compact 4-inch vertical bracket, the pullout force exerted on the top screw reaches 84 lbs of horizontal tension combined with 33.6 lbs of vertical shear. Standard plastic expansion plugs and zinc screw-in anchors hold only 15 to 25 lbs of tensile force in 1/2-inch gypsum drywall before crumbling the gypsum core. Consequently, executing how to install cat wall shelves into drywall and studs correctly requires anchoring directly into framing timber or using mechanical toggle anchors that spread tension across a 2-inch metal channel behind the drywall.
To compare how different mounting methods perform across minimalist platforms, review our evaluations in the best cat wall shelves for large cats analysis, or inspect suction-mounted window platforms in our best window cat perches guide.
The Essential Tools and Hardware Checklist for Cat Shelf Installation
Professional cat shelf installations require commercial-grade fastening hardware and precision measuring instruments. Factory kits often ship with low-quality zinc-plated screws and brittle plastic anchors suited only for picture frames. Replace stock hardware with these verified materials:
| Tool / Hardware Component | Recommended Specification | Primary Architectural Purpose |
|---|---|---|
| Electronic Stud Finder | Franklin Sensors ProSensor or Studpop | Pinpoints exact edges and center of 1.5″ wooden studs |
| Structural Cabinet Screws | GRK Fasteners #9 × 2-1/2″ or 3″ Star-Drive | Hardened steel threads bite 1.5″+ into solid stud timber |
| Drywall Toggle Anchors | Toggler Snaptoggle 3/16″ Heavy-Duty | Solid steel channel clamps rear drywall face under high torque |
| Cordless Drill & Driver | 12V or 18V Brushless Drill Driver | Controls pilot drilling and applies progressive torque without stripping |
| Torpedo Spirit Level | 9-Inch Magnetic Level | Guarantees true horizontal platform orientation to prevent feline slips |
| Painter’s Blue Tape | 1.5-Inch Low-Tack Masking Tape | Maps full-scale wall climbing layouts before drilling holes |
The 6-Step Installation Protocol for Drywall and Stud Mounting
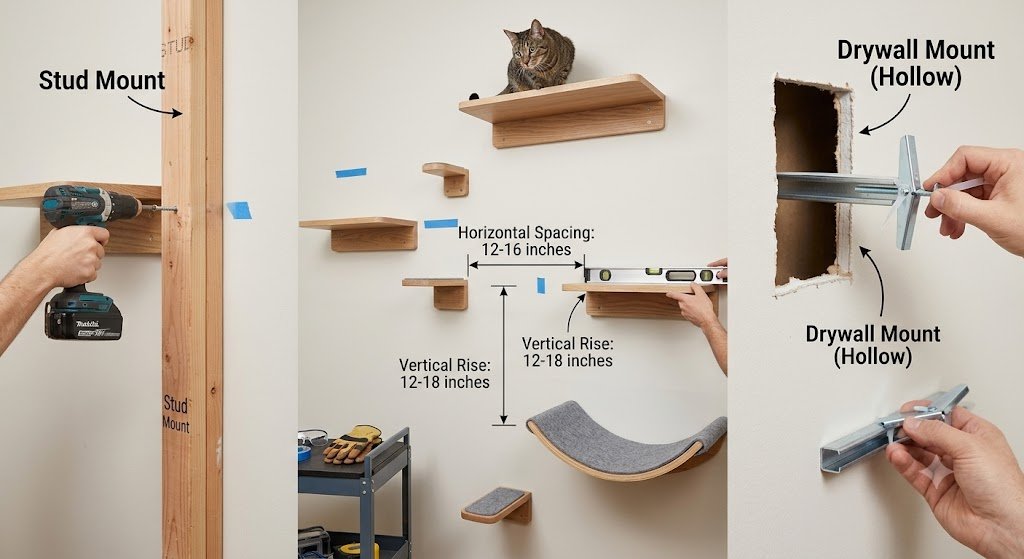
Following a disciplined installation sequence ensures that cat wall shelves remain rock-solid under thousands of dynamic jumping cycles. Implement this step-by-step methodology to achieve maximum structural integrity:
Step 1: Map the Aerial Highway with Painter’s Tape
Before drilling any holes, tape mockups of your shelves on the wall using blue painter’s tape. Maintain a vertical rise of 12 to 18 inches between stepping levels and a horizontal span of 12 to 16 inches. Ensure the path connects logically from existing furniture (sofa backs, desks, or cat trees) to high vantage points near ceilings.
Step 2: Locate Stud Centers and Verify Plumbing/Wiring Clearance
Calibrate your electronic stud finder and slide it horizontally across the wall. Mark both outer edges of the stud; the true structural center lies exactly halfway between (0.75 inches from either edge). Verify that no electrical switch boxes or plumbing pipes align vertically with your drill targets.
Step 3: Drill Pilot Holes into Wood Stud Centers
Hold the bracket against the wall, level it with your torpedo spirit level, and mark the screw holes with a pencil. Using a 1/8-inch drill bit, drill pilot holes 2.5 inches deep directly into the wooden stud. Drilling pilot holes prevents dense 2×4 timber from splitting and reduces driving torque on the screw head.
Step 4: Install Heavy-Duty Snaptoggle Anchors for Hollow Drywall Gaps
When shelf brackets miss wall studs, drill a 1/2-inch hole into the drywall using a spade bit. Slide the metal channel of a 3/16-inch Toggler Snaptoggle flat through the hole, pull the straps taut until the metal bar rests flush against the backside of the drywall, slide the plastic cap snug against the front wall, and snap off the plastic straps.
Step 5: Fasten Brackets and Torque Progressively
Drive #9 × 2.5-inch structural cabinet screws into the stud pilot holes using a star-drive (Torx) bit, or insert machine screws into the threaded toggle channels. Tighten top and bottom bracket fasteners progressively in alternating turns to seat the bracket flush without crushing the gypsum drywall surface.
Step 6: Execute the 40-Pound Static Shear Load Test
Before introducing your cat to the new installation, apply firm, progressive downward hand pressure (equivalent to 35–40 lbs) on the outer edge of each shelf. If you detect any bracket flexing, screw withdrawal, or drywall crinkling, reinforce the assembly immediately before allowing feline access.
Feline Ergonomic Spacing: Vertical Incline Angles and Landing Zones
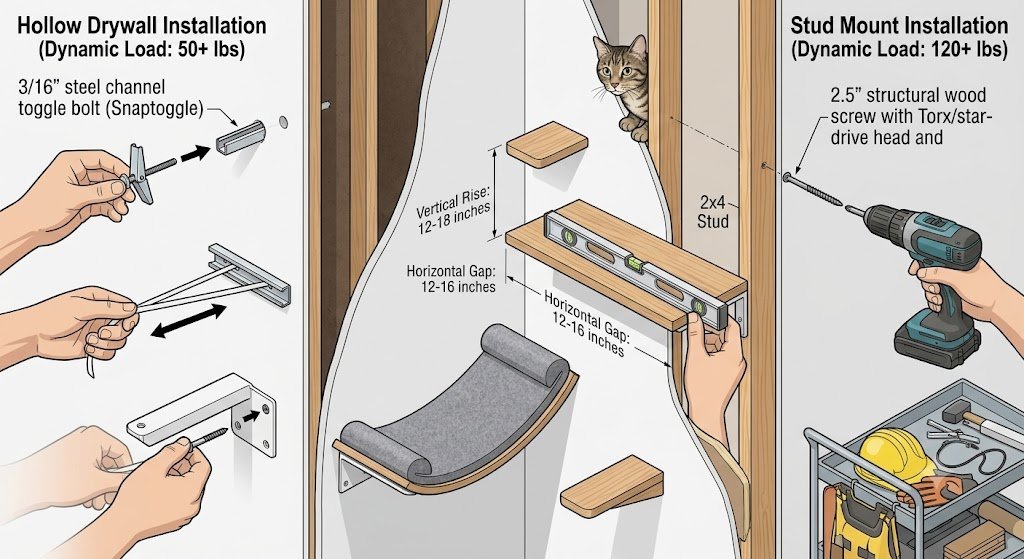
Proper architectural shelf spacing accommodates feline skeletal mechanics and prevents joint hyperextension during descent. Cats descend walls at steeper angles than they climb, subjecting their carpal and shoulder joints to heavy deceleration shock. Structure your wall runway layout around these verified behavioral dimensions:
| Cat Demographics & Mobility Level | Vertical Step Rise | Horizontal Spacing | Recommended Incline Angle |
|---|---|---|---|
| Senior Cats (>10 Yrs) & Arthritic Felines | 8 to 10 inches | 10 to 12 inches | Gentle (25°–30° incline) |
| Average Healthy Adults (8–14 lbs) | 12 to 16 inches | 14 to 18 inches | Standard (35°–40° incline) |
| Athletic Breeds (Bengals, Abyssinians) | 16 to 22 inches | 18 to 24 inches | Dynamic (45°–50° incline) |
| Giant Breeds (Maine Coons, 18+ lbs) | 10 to 14 inches | 12 to 15 inches | Moderate (Wide platforms ≥12″ deep) |
To incorporate complete aerial loops and double-ended escape routes into your room plan, consult our architectural schematics in the Cat Wall Shelf Layout Guide, or read our tested multi-cat tower reviews in the best cat trees for multiple cats guide.
Drywall Patching Protocol: Restoring Walls for Renters upon Move-Out
Restoring drywall holes after removing cat wall shelves requires standard spackling compound and fine-grit sanding. Many cat parents avoid wall-mounted furniture out of fear of losing security deposits. However, repairing 1/8-inch screw holes or 1/2-inch toggle channels is a straightforward 20-minute DIY repair:
- Remove Fasteners and Push Toggles into the Cavity: Back out wood screws using your drill. For toggle bolts, unscrew the bolt; the internal steel channel will drop harmlessly down into the wall stud cavity, leaving a clean circular hole.
- Bevel the Hole Edges: Press the rounded handle of a putty knife firmly into the rim of the drywall hole to push frayed paper fibers slightly inward. This creates a shallow recessed crater that holds patching compound securely.
- Apply Premium Drywall Spackle: Fill the hole with lightweight spackling paste using a 3-inch putty knife, skimming flush against the painted drywall surface. For holes larger than 1/2-inch, apply a self-adhesive mesh patch first.
- Sand Flush and Touch-Up Paint: Allow the spackle to dry for two to four hours. Sand smooth with a 220-grit sanding block, wipe away dust with a damp cloth, and apply a matching coat of interior wall paint.
Troubleshooting Cat Shelf Failures: Root Causes and Quick Fixes
Diagnosing cat shelf instability early prevents bracket failure and protects your feline companion from traumatic falls. If an installed shelf displays movement or sagging, apply these engineered corrective fixes immediately:
| Observed Shelf Symptom | Underlying Mechanical Failure | Corrective Engineering Fix |
|---|---|---|
| Shelf tilts downward at outer edge | Top screw pulling out of drywall under cantilever moment | Replace top screw with a 3/16″ steel Snaptoggle bolt, or relocate to a wood stud |
| Bracket rocks side-to-side on wall | Screw missed stud center and split the wood edge | Use an electronic sensor to re-find true center; drill new pilot hole 1″ above or below |
| Drywall paper crumbles around screw | Over-torquing crushed gypsum core behind bracket plate | Install a wider steel backer plate to bridge crushed drywall and distribute compression |
| Cat refuses to step onto platform | Surface is too slick, or platform exhibits micro-wobble | Fasten self-adhesive ribbed carpet or wool felt inlays to provide immediate claw grip |
Final Verdict: The Golden Rule of Cat Shelf Installation
Fastening load-bearing brackets into solid wood framing studs remains the single most critical safety rule when mastering how to install cat wall shelves into drywall and studs. While heavy-duty steel toggle bolts provide dependable secondary support for lightweight steps on open drywall spans, primary high-traffic perches demand the shear strength of #9 or #10 structural screws driven directly into 2×4 timber framing.
By combining proper stud anchoring with a 35-to-40-degree ascent slope and high-traction carpet surfaces, you create an enriching vertical highway that satisfies your feline’s instinct to climb while safeguarding your home’s drywall integrity permanently.
Frequently Asked Questions (FAQ)
Can you install cat wall shelves without drilling into studs?
Yes, but you must use heavy-duty steel toggle bolts (such as Toggler Snaptoggles) rated for at least 50 lbs per anchor. Never use standard plastic expansion plugs or self-drilling zinc anchors, as dynamic feline jumping force will pull them out of hollow drywall.
What size screws should I use to install cat wall shelves into studs?
Use #9 or #10 structural cabinet wood screws measuring 2.5 to 3.0 inches in length. This accounts for 1/2-inch drywall thickness and allows the screw threads to penetrate at least 1.5 to 2.0 inches into the solid wooden framing stud.
How far apart should cat wall shelves be installed?
Space cat shelves 12 to 18 inches apart vertically and 12 to 16 inches apart horizontally. For senior or arthritic cats, reduce vertical spacing to 8 to 10 inches to avoid joint hyperextension during descent.
How do I know if I hit a wall stud when drilling?
When drilling into a stud, you will feel consistent mechanical resistance as the bit cuts through 1/2-inch drywall and enters dense timber. You will also see wood shavings on the drill bit flutes when backing out. If the drill pushes through effortlessly after 1/2 inch into empty air, you missed the stud.
